--debug 在日志中打开调试输出 --address value, -a value containerd的GRPC服务器地址(default: "/run/containerd/containerd.sock") [$CONTAINERD_ADDRESS] --timeout value CTR命令总超时时间 (default: 0s) --connect-timeout value 连接到containerd的超时(default: 0s) --namespace value, -n value 与命令一起使用的命名空间(default: "default") [$CONTAINERD_NAMESPACE]
runtime-endpoint: Container runtime endpoint image-endpoint: Image endpoint timeout: Timeout of connecting to server (default: 2s) debug: Enable debug output (default: false) pull-image-on-create: Enable pulling image on create requests (default: false) disable-pull-on-run: Disable pulling image on run requests (default: false)
选项:
1 2 3
--get value show the option value --set value set option (can specify multiple or separate values with commas: opt1=val1,opt2=val2) --help, -h show help (default: false)
[root@node1 ~]# cat data2.txt This is line number 1. This is line number 2. This is line number 3. This is line number 4. [root@node1 ~]# awk '{print $5}' data2.txt 1. 2. 3. 4.
[root@node1 ~]# cat data2.txt This is line number 1. This is line number 2. This is line number 3. This is line number 4. [root@node1 ~]# awk '{$4="line";print $0}' data2.txt This is line line 1. This is line line 2. This is line line 3. This is line line 4.
awk 中还可以指定脚本命令的运行时机。默认情况下,awk 会从输入中读取一行文本,然后针对该行的数据执行程序脚本,但有时可能需要在处理数据前运行一些脚本命令,这就需要使用 BEGIN 关键字。
BEGIN 会强制 awk 在读取数据前执行该关键字后指定的脚本命令,例如:
1 2 3 4 5 6 7 8 9 10 11
[root@node1 ~]# cat data2.txt This is line number 1. This is line number 2. This is line number 3. This is line number 4. [root@node1 ~]# awk 'BEGIN {print "hello world:"} {print $5}' data2.txt hello world: 1. 2. 3. 4.
a\ 在当前行下面插入文本; i\ 在当前行上面插入文本; c\ 把选定的行改为新的文本; d 删除,删除选择的行; D 删除模板块的第一行; s 替换指定字符; h 拷贝模板块的内容到内存中的缓冲区; H 追加模板块的内容到内存中的缓冲区; g 获得内存缓冲区的内容,并替代当前模板块中的文本; G 获得内存缓冲区的内容,并追加到当前模板块文本的后面; l 列表不能打印字符的清单; n 读取下一个输入行,用下一个命令处理新的行而不是用第一个命令; N 追加下一个输入行到模板块后面并在二者间嵌入一个新行,改变当前行号码; p 打印模板块的行。 P(大写) 打印模板块的第一行; q 退出Sed; b lable 分支到脚本中带有标记的地方,如果分支不存在则分支到脚本的末尾; r file 从file中读行; t label if分支,从最后一行开始,条件一旦满足或者T,t命令,将导致分支到带有标号的命令处,或者到脚本的末尾; T label 错误分支,从最后一行开始,一旦发生错误或者T,t命令,将导致分支到带有标号的命令处,或者到脚本的末尾; w file 写并追加模板块到file末尾; W file 写并追加模板块的第一行到file末尾; ! 表示后面的命令对所有没有被选定的行发生作用; = 打印当前行号; # 把注释扩展到下一个换行符以前;
sed替换标记
1 2 3 4 5 6 7
g 表示行内全面替换; p 表示打印行; w 表示把行写入一个文件; x 表示互换模板块中的文本和缓冲区中的文本; y 表示把一个字符翻译为另外的字符(但是不用于正则表达式); \1 子串匹配标记; & 已匹配字符串标记;
[root@node1 ~]# cat data1.txt This is a test of the test script. This is the second test of the test script.
替换后为
1 2 3
[root@node1 ~]# sed 's/test/hello/2' data1.txt This is a test of the hello script. This is the second test of the hello script.
可以看到,使用数字 2 作为标记的结果就是,sed 编辑器只替换每行中第 2 次出现的匹配模式。
如果要用新文件替换所有匹配的字符串,可以使用 g 标记:
1 2 3
[root@node1 ~]# sed 's/test/hello/g' data1.txt This is a hello of the hello script. This is the second hello of the hello script.
-n 选项会禁止 sed 输出,但 p 标记会输出修改过的行,将二者匹配使用的效果就是只输出被替换命令修改过的行,例如:
1 2 3 4 5
[root@node1 ~]# cat data1.txt This is a test of the test script. This is the second test of the test script. [root@node1 ~]# sed -n 's/second/hello/p' data1.txt This is the hello test of the test script.
w 标记会将匹配后的结果保存到指定文件中,比如:
1 2 3 4 5
[root@node1 ~]# sed 's/second/hello/w test.txt' data1.txt This is a test of the test script. This is the hello test of the test script. [root@node1 ~]# cat test.txt This is the hello test of the test script.
[root@node1 ~]# sed 's:test:ok:g' data1.txt This is a ok of the ok script. This is the second ok of the ok script. [root@node1 ~]# sed 's#test#ok1#g' data1.txt This is a ok1 of the ok1 script. This is the second ok1 of the ok1 script. [root@node1 ~]# sed 's|test|ok2|g' data1.txt This is a ok2 of the ok2 script. This is the second ok2 of the ok2 script.
4.2 删除命令:d
删除空白行
1 2 3 4 5 6 7 8 9 10
[root@node1 ~]# cat data2.txt This is line number 1. This is line number 2. This is line number 3. This is line number 4. [root@node1 ~]# sed '/^$/d' data2.txt This is line number 1. This is line number 2. This is line number 3. This is line number 4.
删除指定行
1 2 3 4
[root@node1 ~]# sed '2d' data2.txt This is line number 1. This is line number 3. This is line number 4.
删除第二行到末尾所有行
1 2
[root@node1 ~]# sed '2,$d' data2.txt This is line number 1.
删除最后一行
1 2 3 4
[root@node1 ~]# sed '$d' data2.txt This is line number 1. This is line number 2. This is line number 3.
在此强调,在默认情况下 sed 并不会修改原始文件,这里被删除的行只是从 sed 的输出中消失了,原始文件没做任何改变。
4.3 插入命令:a和i
a 命令表示在指定行的后面附加一行,i 命令表示在指定行的前面插入一行,这里之所以要同时介绍这 2 个脚本命令,因为它们的基本格式完全相同,如下所示:
1 2 3 4 5 6
[root@node1 ~]# sed '3i/This is an inserted line.' data2.txt This is line number 1. This is line number 2. This is an inserted line. This is line number 3. This is line number 4.
1 2 3 4 5 6
[root@node1 ~]# sed '3a/This is an inserted line.' data2.txt This is line number 1. This is line number 2. This is line number 3. This is an inserted line. This is line number 4.
4.4 替换文本命令:c
c 命令表示将指定行中的所有内容,替换成该选项后面的字符串。
1 2 3 4 5
[root@node1 ~]# sed '3c/This is an inserted line test.' data2.txt This is line number 1. This is line number 2. This is an inserted line test. This is line number 4.
[root@node1 ~]# cat data2.txt This is line number 1. This is line number 2. This is line number 3. This is line number 4. This is line number 5. This is line number 6. This is line number 7. This is line number 8. This is line number 9. [root@node1 ~]# sed 'y/123/789/' data2.txt This is line number 7. This is line number 8. This is line number 9. This is line number 4. This is line number 5. This is line number 6. This is line number 7. This is line number 8. This is line number 9.
[root@node1 ~]# cat data2.txt This is line number 1. This is line number 2. This is line number 3. This is line number 4. This is line number 5. This is line number 6. This is line number 7. This is line number 8. This is line number 9. This is line number 10. This is line number 11. This is line number 12. [root@node1 ~]# sed 'y/123/789/' data2.txt This is line number 7. This is line number 8. This is line number 9. This is line number 4. This is line number 5. This is line number 6. This is line number 7. This is line number 8. This is line number 9. This is line number 70. This is line number 77. This is line number 78.
sed 转换了在文本行中匹配到的字符,无法限定只转换在特定地方出现的字符。
4.6 打印命令:p
p 命令表示搜索符号条件的行,并输出该行的内容
1 2 3 4 5 6 7
[root@node1 ~]# cat data2.txt This is line number 1. This is line number 2. This is line number 3. This is line number 4. [root@node1 ~]# sed -n '/number 2/p' data2.txt This is line number 2.
[root@node1 ~]# sed -n '/3/{> p> s/line/test/p> }' data2.txt This is line number 3. This is test number 3.
4.7 写入命令:w
w 命令用来将文本中指定行的内容写入文件中,如果不想让行直接输出,可以用 -n 选项
可以看到,通过使用 w 脚本命令,sed 可以实现将包含文本模式的数据行写入目标文件。
1 2 3 4
[root@node1 ~]# sed -n '1,2w test2.txt' data2.txt [root@node1 ~]# cat test2.txt This is line number 1. This is line number 2.
4.8 插入文件命令:r
r 命令用于将一个独立文件的数据插入到当前数据流的指定位置
1 2 3 4 5 6 7 8 9 10
[root@node1 ~]# cat test2.txt hello world This is line number 2. [root@node1 ~]# sed '2r test2.txt' data2.txt This is line number 1. This is line number 2. hello world This is line number 2. This is line number 3. This is line number 4.
如果你想将指定文件中的数据插入到数据流的末尾,可以使用 $ 地址符
4.9 退出命令:q
q 命令的作用是使 sed 命令在第一次匹配任务结束后,退出 sed 程序,不再进行对后续数据的处理。
1 2 3
[root@node1 ~]# sed '2q' data2.txt This is line number 1. This is line number 2.
4.10 多点编辑:e
允许在同一行里执行多条命令:
1 2 3 4
[root@node1 ~]# sed -e '1d' -e 's/line/hello/' data2.txt This is hello number 2. This is hello number 3. This is hello number 4.
sent 465,714 bytes received 762 bytes 932,952.00 bytes/sec total size is 4,759,531 speedup is 10.20
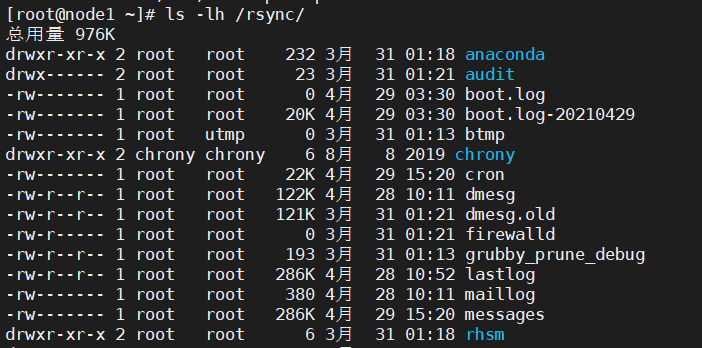
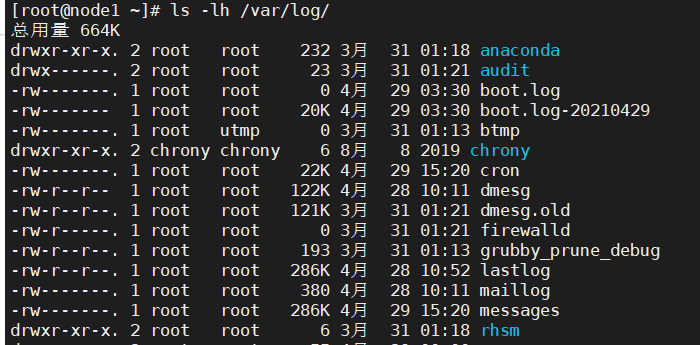
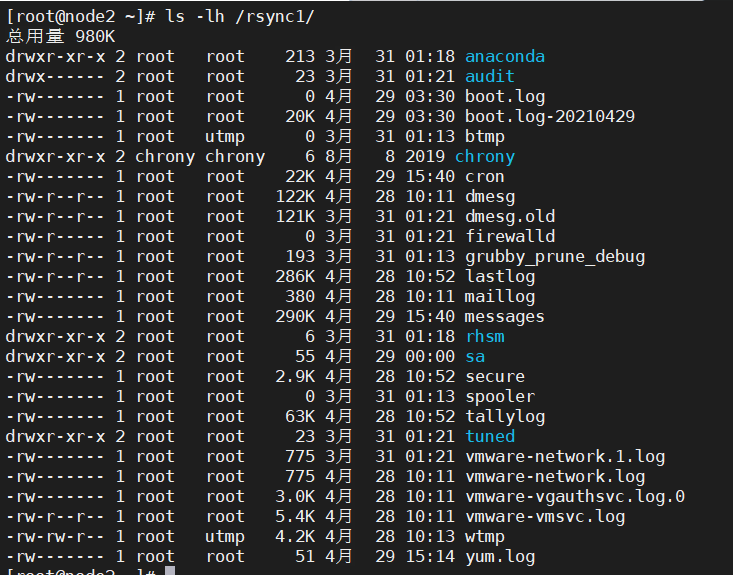
如下图所示,在同步期间保留了补充
7、将文件从本地同步到远程目录
rsync允许在本地和远程系统之间的同步文件/目录,应该是本地和远程系统都要安装rsync才行
1 2 3 4 5 6 7 8 9 10 11 12 13 14 15 16
[root@node1 ~]# rsync -zva /var/log/ root@192.168.10.200:/rsync
The authenticity of host '192.168.10.200 (192.168.10.200)' can't be established.
ECDSA key fingerprint is SHA256:CQ+Ueun/hBJkSNzWjqdNDLc3bFsfS8RwWTYeX3aD3Ak.
ECDSA key fingerprint is MD5:4d:fd:8a:6f:99:16:33:39:fb:c9:7c:1b:16:61:ea:07.
Are you sure you want to continue connecting (yes/no)? yes
Warning: Permanently added '192.168.10.200' (ECDSA) to the list of known hosts.
root@192.168.10.200's password:
sending incremental file list
created directory /rsync
./
boot.log
......
tuned/tuned.log

sent 465,718 bytes  received 791 bytes  71,770.62 bytes/sec
total size is 4,759,531  speedup is 10.20